Wednesday, February 17, 2016

Ada Conditionals

I will cover conditional statements in this post. Conditionals are how code makes choices.


The basic syntax of a conditional statement is:

if condition1 then

               what happens if condition1 passes

end if;

In Ada, any conditional must come after the begin statement and before the end [procedure name] statement.

Choice Between Two Things - If and Else


There is also a way to make a choice between two things - if one condition is not met, then such and such will happen.

The syntax of this is:

if condition1 then

               what happens if condition1 passes

else

               what happens if condition1 did not pass

end if;

Nested Conditional


The next scenario describes how code will make choices that lead to further choices. These are nested conditionals.

This is the syntax of a nested conditional:

if condition1 then

                  --condition1  passed, now check if condition2 will
           
                  if condition2 then
                                       --condition2 passed

                                       what happens if condition 2 passes


                  end if;


else

                 --what happens if condition1 did not pass

                  if condition3 then
                                       --condition3 passed

                                       what happens if condition 3 passes

                  end if;


end if;


Compound Conditional

A compound conditional is another way code makes choices. It involves giving two conditions in one, such as checking if number1 is greater than zero AND if number1 is less than two.

There are two ways two write these: using and or or. I will describe the use of these operators in the Logical Operators section.

It would look like this:


if condition1 and condition2 then

               what happens if condition1  AND condition2 passes

else

               what happens if condition1 OR condition2 did not pass

end if;

Elsif

Another important way of testing is using elsif. This is like an extension if else in that you can provide a condition that you want to be tested if the initial if or previous elsif in the same conditional tree had failed.

The syntax is as follows:


if condition1 then

               what happens if condition1 passes

elsif condition2 --IF CONDITION1  FAILED

               what happens if condition2 passes

elsif condition3 --IF CONDITION2  FAILED

               what happens if condition3 passes
end if;


Logical Operators

The most common operators are:

1) and 
2) or
3) not

and is used to test if BOTH conditions are being met. If so, the test will pass, and if not, the test will fail.

or is the opposite in that it checks of EITHER of the conditions are being met. If so, the test will pass. If neither are, it will fail.

not is used for turning a condition in the opposite direction. If the condition is num1 = num2, then using not will turn the condition into num1 /= num2 (num1 does not equal num2).


Code Examples

If-Then

The first is an example of a simple conditional to see if a piece of code is either done or not done (if - then):


The output:


If-Else

This example gives you an idea of how an if-else works in Ada.


The initial condition will fail, causing the else-code to run.
The output:


If-Elsif-Else


The output:


Nested, Compound, Logical Operators


The output:


Tuesday, February 9, 2016

Variables, Constants, and Arithmetic in Ada

Declaring and Initializing Variables

Variables in interpreted languages, not functional ones, are ways to store information for use in a program. To be clear, Ada is an interpreted language, and thus does use variables!

The syntax for creating (declaring) a variable is as follows:

name_of_variable : type_of_variable;

To assign a variable an initial value, we do:

name_of_variable : type_of_variable := value;

The " := " is how we set or assign variables to values. Let's say we want to initialize a variable a value and then change it later. We do:

myVariable: integer := 5;
begin
     myVariable := 6;
end

Notice how we can put the changing of the variable after the "begin" keyword. 

We can also use the declare keyword to declare variables. It would go something like this:

begin
     declare
          -- declarations

     begin
           --initializations

     end

end

Types of Variables and How to Display Them in Output

Here is a list of very common variables with examples of each and how you would display them in the Put_Line statement. The variable names of each in these examples of display syntax are "my"+Type. Replace it with your variable name.


            Type                           Examples                                         Display Syntax
integer
1, 2, 3
Put_Line(integer’image(myInteger))
float
5.1, 6.75, 14.5
Put_Line(float’image(myFloat))
String
“Hello there”, “Area = 80.”
Put_Line(myString)
character
‘M’, ‘a’
Put_Line(character’image(myCharacter))
Decimal_Number
5.1, 6.75, 14.5
Put_Line(Decimal_Number’image(myDecimal))
Natural_Number
1, 2, 3
Put_Line(Natural_Number’image(myNaturalNum))

As you can see, the display syntax of each variable is consistent:

For numbers: Type'image(variable)
For strings: just the variable.


Constants

Constants are unchangeable values. These can be declared by placing "constant" before the variable type when declaring AND initializing a variable. The syntax is as follows:

variableName : constant type := value;

NOTE: You MUST initialize constants.


Specifying Ranges:

Decimal_Number and Natural_Number


Range of certain variables can be specified using Decimal_Number and Natural_Number. to use these variables, we have to declare the precision of them.

The syntax is as follows for Natural_Number:

type Natural_Number is Range minNum .. maxNum;

where minNum and maxNum are integer values. This will create limits for how low or high a natural_number can be.

For Decimal_Number:

type Decimal_Number is digits numDigits;

where numDigits is an integer value. This will specify how many digits a decimal_number will have.

What do I mean by "number of digits"? Here's some examples:

5.002 has 4 digits whereas 52.1 has 3 digits.

This is a program to demonstrate Decimal_Number and Natural_Number:

The output:


As you can see, the digits displayed in number1 is exactly 3, the number of digits we specified in the precision statement.

Arithmetic in Ada

Ada uses fairly common operators for arithmetic.

The list:

+      Addition
-       Subtraction
*      Multiplication
/       Division
**    Exponents
&     Concatenation

How do we perform arithmetic with variables? There are one quite annoying rule that we have to follow in Ada:

If the variables are types of numbers, you can only do arithmetic with variables of the same type.

So, it is not possible to do an Integer + Float not a Natural_Number - Decimal_Number or a Decimal_Number * float .

Here is an example of calculating the area of a circle. It uses float point numbers, multiplication, constantsstrings, and string concatenation with those float variables to give us a nice message to explain the output:


The output of this code:

:


Here is another example of a simple calculation of a bunch of numbers.


And, the output of this code, telling us what numbers were involved in this calculation, the operators, and the result.


Wednesday, February 3, 2016

First Ada Program - Hello, World! With How-to and Feedback on Compiler

Hello, World!

I will quickly state here the source code and output for "Hello, World!" in Ada along with an explanation of some of the lines. The next section will explain how one obtains this compiler and how to create and run programs on it.

Source code:


This code prints "Hello, World!" to the output.

The way Ada works is we must specify that we are going to use the text input output before writing the procedure.

This is done using the first line of the code given:

                  with Ada.Text_IO; use Ada.Text_IO;

Next, Put_Line is used to specify what to output.

                  Syntax: Put_Line("[insert text]");
The output can be seen in the "Run" Section at the bottom of the compiler interface. I highlighted it to make it more obvious.


How to Acquire the Compiler GNAT - GPS (Gnat Programming Studio) for Ada

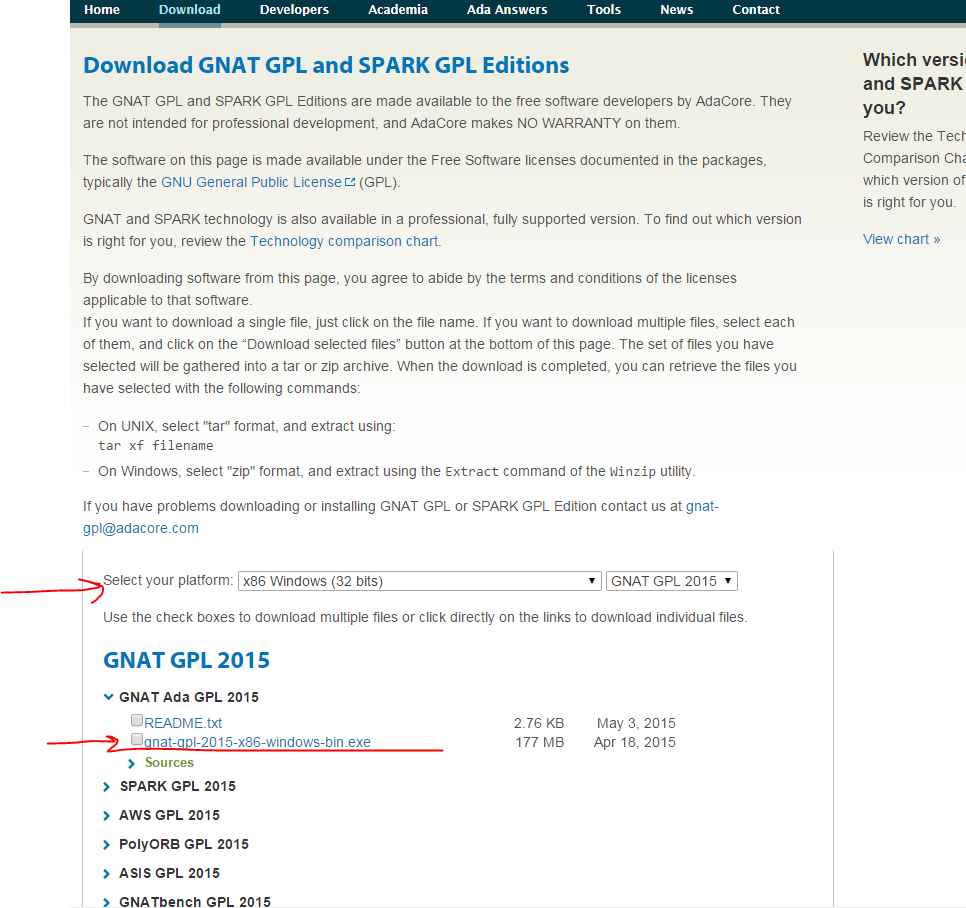
One obtains this compiler by going to http://libre.adacore.com/

Follow the pictures to install for windows. I have not been successful installing it on my Mac.

1. Go to Site and click Download.


2. Choose usage and hit build package.


3. Select x86 Windows (32 bits) and click the first .exe file under GNAT Ada GPL 2015


4.  After completing install, to run search gps.exe and run that. That will open GPS!

How To Create a Project and Run Programs

VERY IMPORTANT SECTION.

1. ALWAYS create new project with the Wizard. Otherwise the project will not function correctly nor run. This also gives you the option to Open and Existing Project. Select OK.


2. Choose Single Project. It is the most simple for our purposes for the time being. Then, hit Forward.


3. Now, type the name of the project you would like to create and choose a directory to store the project file in. This will be where your Program Files will be stored as well, such as the source code for Hello, World!

Click Forward.

4. The next screen you will see is a Languages screen. Select Ada and then choose Apply. We do not have to change anything else right now.


5. You have now created a Project! This is the main screen. The files under the blue file-bin-icon thing will probably be names "0" and "1" for you. Those are just the directory file names hidden by those numbers. There is a setting that allows you to disclose the file directory names, which I selected. It is not needed to run a program, just preference.


6. Now we must create a New file. This will be your program file where you type source code. Click the page icon with a plus at the top of the interface near File and Edit.


Doing so will bring up a blank, editable page named "Untitled". Below is the edited version of it with source code for Hello. World! After or before editing, save the file as the default name it gives you. In this case, it is "hello.adb" because the procedure name will be the name of your file.

Example: procedure HiBye is --> name of file = "hibye.adb"

The extension for your program file MUST be .adb --- NOT .ada as it would make sense to be.


7. Now, for the weird part. Go to the top of the interface and select Project, then Properties. A window will appear. Select Main files. Click the +Add button and select the program file you just created. Doing so will result in a screen like this:


Select OK.

8. Now, we must Build the program. Select this icon at the top of the interface: 


Doing so will result in these messages.


If it results with "process terminated successfully," you're good to go!

9. Lastly, we have to Run the program. Select this icon at the top of the interface:


This will execute your program and show your output in the Run: section at the bottom of the interface. The highlighted portion is your output!


Feedback on Ada - Reactions so far

As of right now, I think Ada is pretty simple and actually very easy to learn.

However, although Ada is simple, getting the program to run for the first time was such a hassle. It was absurd how many steps it took to just get it to run. The compiler interface's warnings about what is wrong did not inform me enough about what to do to fix the problem. I had to resort to a couple hours of google searching and whatnot to compose a formula as to how to get it to successfully build and run the program.

Now that the compiler issue is out of the way, I think this language will be a lot more fun to learn!